Sunday, December 18, 2011

Amigurumi Mini Giraffe 小小長頸鹿鉤織娃娃

除了愛睡綿羊寶寶, 我收藏已久的另一鉤織娃娃圖樣就是這個小小長頸鹿了. 之前尋找長頸鹿鉤織圖樣時就已經找到這個網頁, 只是當下更喜歡K4TT的長頸鹿抱枕娃娃, 所以就把這個先擱一旁, 直到最近有空才開工.

Besides the Sleepy Baby Sheep, I've collected this Mini Giraffe crochet pattern for long. Found this when previously searching for the giraffe crochet pattern, but at that time was more attracted to K4TT's Pillow Pal Giraffe, so had to put aside this one, until recently I found the time to make it.

(almost) one piece giraffe pattern

這個圖樣自稱為幾乎一件式, 是由於從頭到其中一腳, 都是連續性的鉤下去, 然後另外三隻腳駁線接上去, 隨後把鼻頭, 耳朵和觸角縫上, 最後加上眼睛和鼻孔完成.

This pattern named as almost one piece, because start from the head to one of the leg, it was crocheted continuously, and the other three legs were done by attaching new yarn to the body, then sewed the nose, ears and horns, finally added the eyes and nostrils to complete.

原版圖樣還注明只是鉤織back loop, 我卻忘了, 不過還好出來沒有很怪的樣子.
而原作者說她是左撇子, 所以鉤織方向會不一樣, 我卻沒有注意到這點, 我這個右撇子竟然可以完全根據她的步驟完成, 哈~
不過這圖樣有一個明顯的不同, 就是鉤織的標號, 都是使用英式名詞, 而不是一般的美式名詞, 還好這網頁上還有提供轉換表方便查找.

The original pattern mentioned to crochet into back loop only, but I forgot, luckily the outcome was not weird looking.
Besides, the pattern owner stated that she is a lefty, so the crochet direction was different, but I didn't notice that, so I still follow her instruction even though I'm right handed, haha~
However, the obvious different in this pattern, was the crochet terms, it used English terms instead of American terms, but luckily the conversion chat was provided in the website too for user convenient.

我的這隻小小長頸鹿使用的顏色和原版不一樣, 所以感覺也有點不同. 而由於我的版本身體是單色, 所以我還鉤了幾個斑點圈圈給它.
這一次終於是一隻名副其實的"長頸"鹿了(之前長頸鹿抱枕娃娃就常被問為甚麼脖子那麼短), 可是卻有著四條胖嘟嘟的腿. 不過, 好可愛哦!

My mini giraffe is having a different color as compare to the original, so the feel is a bit different. And since my version is having single color on the body, so I added some spots for it.
Finally, this time is a real "long neck" giraffe (I was frequently being asked on why the neck was so short for my Pillow Pal Giraffe), but with four short and fatty legs. Anyway, it is so cute!


接下來, 來兩張我的鉤織娃娃最近的新成員合照吧~

Let me share two photos of the new members of my crochet toy collections~


Pin It Now!

Saturday, December 17, 2011

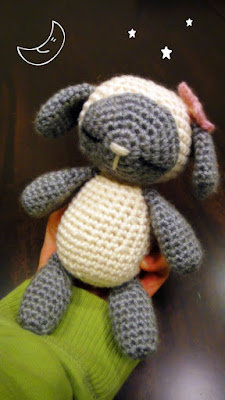
Amigurumi Sleepy Baby Sheep 愛睡綿羊寶寶鉤織娃娃

完成了老公的聖誕禮物, 終於有時間可以動手做我久違的鉤織娃娃了.

After completing my Christmas present for hubby,  finally I have time to make the amigurumi that I've put aside for quite a while.

這個綿羊寶寶的鉤織圖樣其實已經在我的存檔蠻久了, 可是因為之前一直有許多想要先弄的作品, 所以現在終於可以把它挖出來了.

I've had this baby sheep crochet pattern for a long time, but before this there was always something else that in queue, so now finally I can dig it out.

Baby Sheep Free Pattern

當初看到照片就愛上這只綿羊寶寶了, 愛睡的樣子真是可愛極了! 加上款式其實不複雜, 所以用了一天把它完成.

The moment I saw the photo of this baby sheep, I just fall in love with it as it is so cute! Besides, the pattern was quite simple, I've used a day to finish it.

可是出來的效果不如我想像的好, 絕對沒有原版的可愛, 我猜可能是原版的白色毛線是毛茸茸的那種, 而我使用的只是一般的毛線. 而且原版說不要把肚子塞得鼓鼓的, 我卻相反, 因為我喜歡握起來漲漲的感覺, 然後製作身體和頭時要用比較大號的鉤針, 而我因為沒有, 所以整個娃娃都是同一號鉤針, 所以就沒有原版那種手腳小小的樣子. 原版的看起來好好抱哦!

The outcome was not as I expected, not as cute as the original, I guess maybe because I used the normal yarn instead of the furry yarn for the white part. And the pattern stated just slightly stuff the tummy, I did the opposite, as I like the feeling of squeezy, and the body and head suppose to use a larger size hook, since I don't have it, I had to complete the whole thing in one size hook, causing to not have the small hand and foot as in the original. The original looks so comfortable to hug!

無論如何, 我還是很喜歡它的~

Anyway, I still love it~


Pin It Now!

Friday, December 16, 2011

Raglan Sleeved Pullover 插肩長袖毛衣

蠻久之前就買了一本專織男性款式的棒針書<Knits Men Want>, 因為覺得老是在為自己編織, 卻甚少為老公弄個甚麼, 之前最厲害的就只有去年那件格子毛背心了. 所以在我忙完那條雙面圍巾後, 就動手這一個項目了.

I've bought this specially knitting for guys book <Knits Men Want> for quite some time already, as I always knit for myself, but seldom knit anything for my hubby, the most was just the argyle vest that I knitted last year. So after I finished the double knitting scarf, I decided to start this project.

從書中選了兩個款式, 一件是Raglan Sleeved Henley, 另一件是Baseball Jersey. 最後決定是第一款, 因為沒有嘗試過插肩式, 而且這個款式也比較簡單.

I've chosen two styles from the book, one is the Raglan Sleeved Henley, another is the Baseball Jersey. Finally I decided to make the first style, as I never try knitting raglan style before, and this pattern is much easier.

插肩式其實真的蠻簡單, 只是從領口處開始用輪針慢慢的增加針目一片式的織下去, 所以肩膀上, 袖子上和主衣邊上不會出現縫接處, 整體比較美觀.
而且這也是我第一次嘗試長袖和有紐扣的款式, 其實沒有想像難~

Raglan style was pretty easy actually, all start at the neck edge with circular needle, slowly increased the stitches and knitted one piece from top down, so there was no sewing edges at the shoulder, sleeves and main body, overall it looked tidier.
Besides, this was my first time trying a pattern with long sleeves and button, it was not as hard as I thought~

原本款式只是單一顏色, 可是我想要購買的毛線數量不夠, 所以我就稍微更改了一下, 把中間部分改為淺灰色, 然後在袖口處也給編上兩條淺灰色, 不會那麼單調.

The original pattern called for only one color yarn, but the yarn that I wanted was not enough in stock, so I decided to slightly change the pattern, which the middle part of the main body had been changed to light grey, while knitted two light grey stripes at the sleeve ends.

東方人的身體沒有老外的寬, 也沒有他們的身體那麼長, 所以我把身體部分的長度縮減, 然後袖子部分也稍作修改得較窄一些. 可是老公說穿上去好像還是覺得寬了些, 抱歉啦, 我的功力還不夠嘛...

Our Asian body was not as wide and slender as the Western guy, so I've shorten the length of the body part, and tighten abit on the sleeve part too. However, hubby was saying it is still a bit too loose for him, I'm sorry dear, my skill is not that good yet....

無論如何, 這就是我送給老公今年的聖誕禮物啦!

No matter how, this will be my Christmas present for my dear hubby!


Pin It Now!

Tuesday, November 15, 2011

Double Knitting Snowflakes Scarf 雪花飄飄圍巾

Winter is coming and I just feel like knitting some snowy themed scarf.

冬天即將來臨, 而我很想要織一條以雪為主題的圍巾.

I was looking for a technique which I can have the reverse side of the scarf to look as pretty as the front, no offense but I personally do not really like the look of purl stitch, then I came across this technique called "Double Knitting" which can fulfill my demand.
The best part of it is, I can knit both sides at the same time with a seamless edge, creating a double thickness and warmness for the cold winter, and also stunning motifs on both sides with contrast colors.
Double knitting is not something complicated, anyone who can knit and purl can do this, just consider this a level up as doing both at the same time.

我一直想要找尋一種針織技巧, 可以前後都一樣漂亮, 因為我個人其實不太喜歡上針編織出來的圖樣, 直到我找到這個叫作"雙面織"的技巧, 完全可以滿足我的要求.
更棒的是, 我可以同時間織前後雙面而擁有無縫邊緣, 織出雙倍的厚度過個暖暖的冬天, 加上可以織出雙面顏色對比的圖案.
雙面織其實不是甚麼複雜的東西, 任何懂得上針和下針的人就可以做到, 就把它當作是一個升級版, 因為現在需要的是同時上下針.

I've gathered different kind of snowflakes picture and transformed into the pattern for knitting. Then study the double knitting technique and done some research to find the best way to cast-on and bind-off for seamless edges, so that no bulky edges as in the common long tail cast-on or the knit-knit-pass-first-stitch-over-second bind-off method.

我收集了許多不同種類的雪花圖案, 再把它們轉換成針織圖樣. 然後了解雙面織的技巧, 和做了一些功課找出最好的起針和收邊的方法, 可以織出無縫的邊緣, 而不像一般的起針收針法會出現的明顯的邊緣.

This is the first try to design my own scarf pattern, the download link is available below. If unable to see the preview, just email me at changweiyun@hotmail.com and I'll send you the PDF file.
** FOR PERSONAL USE ONLY **
Feel free to comment if anything unclear.

這是我第一次嘗試設計圍巾圖樣, 下載地址在下面. 如果沒辦法預覽, 請寄郵件給我changweiyun@hotmail.com, 我會把PDF文件檔email給你.
** 只供個人用途 **
若有任何疑問, 歡迎留言.

DOWNLOAD PATTERN HERE~  在此下載圖樣~

I've made three videos in order to help out whoever interested in knitting this scarf.

我錄製了三段視頻, 希望可以幫助有興趣針織這條圍巾的朋友.

(1) Cast-on for Double Knitting Scarf 雙面圍巾的起針法


(2) Knitting the Pattern 針織圖樣步驟


(3) Bind-off for Double Knitting Scarf 雙面圍巾的收針法


There are multiple ways to wear this scarf, and I'm showing a couple of them as below.

這條雙面圍巾可以有很多種穿法, 下面我展示了幾種.


Pin It Now!

Friday, October 7, 2011

String Bean Western Style 乾扁四季豆

在我記憶裡, 我吃過最好吃的乾扁四季豆, 是在家鄉的一家小川菜館, 可惜他們已經沒有營業了, 也許因為如此, 每每去吃川菜, 幾乎都一定會點這道乾扁四季豆, 可是也幾乎沒有一家做出我想念的味道.

In my memory, the best String Bean Western Style that I had tasted, was in a small Szechuan restaurant in my hometown, too bad they are out of business now, and maybe because of this, almost every time we went for Szechuan cuisine, I'll order this dish, but almost none of them too were able to reproduce the taste that I miss.

因此, 根據我依稀的印象, 也剛好那天在農夫市場買到很新鮮的四季豆, 所以就自己動手試試看可否炒出那個味道.

Therefore, based on my vaguely memory on that, I try to do it myself and see if I could be able to cook that taste, since I've bought some very fresh string beans from the farmer market.

材料方面很簡單, 只是用了四季豆, 蒜蓉, 菜脯碎, 糖, 醬油和菜油.

The ingredient was simple, only needed string beans, minced garlic, chopped dried radish, sugar, soy sauce and vegetable oil.

1) 首先, 把菜脯碎用水沖洗數遍以減少它的咸味(或許某些牌子的菜脯碎如果沒有那麼咸就可以只沖洗一次), 然後家少許糖混合, 待用.
Firstly, rinsed the chopped dried radish through the water for few times to reduce the saltiness (maybe some other brand which doesn't taste so salty can reduce the rinse amount to one), then add some sugar and mix it.

2) 接下來把洗乾淨的四季豆抹乾, 下熱油鍋炸至表皮有點皺皺和帶少許焦褐色, 撈起瀝乾油份.
Dry the washed string beans with kitchen towel, then fry them in the hot oil until the surface become wrinkle and a little burnt-brownish, take them out to drain the oil.

3) 熱鍋,下少許油, 把蒜蓉和菜脯碎爆香, 再下剛才的四季豆一起炒片刻, 最後下醬油(份量根據醬油的咸度, 我用的是少鈉, 所以比一般的多放些)和少許糖炒至全部材料都沾上醬油的顏色即可上菜.
Heat the wok, add in some oil, saute the chopped garlic and dried radish, then put in the string beans and stir fry for a while, at last, add in the soy sauce (the portion depends on the saltiness of the soy sauce, mine is low sodium, so I add in a little bit more) and a pinch of sugar and stir fry until the ingredients all coated with the soy sauce, and it is now ready to serve.

儘管是第一次嘗試, 但是很高興炒出來的味道很棒, 雖然還不到餐館的水平, 但是還是有少許那個想念的乾扁四季豆的味道.

Although this is my first attempt, I'm glad that the taste is delicious, still not up to the restaurant level yet, but at least it bring back some of the taste of the String Bean Western Style in my memory.


Pin It Now!

Thursday, October 6, 2011

Baby Blanket 寶寶小被

7月份的時候探望了老公的妹妹, 得知她有了身孕, 我就自薦的說要鉤織一件寶寶的小被給她, 作為給即將出世的小貝比的禮物.

When we visited my sister-in-law during July and found out that she is pregnant, I've promised her that I'll crochet a baby blanket for her, as the present for the coming new born.

我選擇的鉤織圖案, 也就是毛線包裝上就有提供的一個免費圖案, 可是局部完成的時候, 我覺得尺寸有點小, 所以就多鉤了數行直到我滿意的size, 因此花了我幾乎兩個月的時間才完成 (而當然中間也有偷懶的時間啦~) 這也是我目前為止鉤織過最大件的作品了.

The pattern that I chose was a free pattern at the yarn's packaging, when it was partially completed, the size was kind of smaller than I thought, so I've added a few rows of motif until the desire size, therefore it took me almost 2 months to complete (and of course I did take a break in between~) This is the biggest crochet project I've made so far.

Bernat Baby Blanket

雖然手工沒有很精細, 但是整體感覺還不錯, 希望她喜歡囉~
即將寄出啦~

Although the quality of the craftsmanship was not perfect, but the overall was not bad, and I hope she will like it~
To be mailed out soon~


Pin It Now!

Tuesday, September 13, 2011

Ray's Sushi @ Hayward

週年慶當晚, 我們去了吃壽司.
這家餐廳原本之前在GPS上已經找到, 不過沒去過, 但朋友說很不錯, 然後我上網查了一下, 果真網上對於它的食物評價不賴哦, 所以就決定試試看~

On the night of our anniversary, we went for sushi.
We have found this restaurant through GPS before, but never try it, friend did had a good comment on it, then after I searched online, for sure it has a good review on their food, so we definitely will try it~

Ray's Sushi

網上評價也說他們常爆滿, 而且服務有時不太好, 所以我們有了心理建設, 只是打算轉注在食物上就可以了. 可是那天我們到達已經晚上8點多的高峰時段, 竟然讓我們幸運的一到就有位子, 但是接下來就看到許多人在排隊等候了. 當晚我們體驗到的服務也不錯啊, 網友投訴的不裝茶水的問題也沒有發生在我們身上~

According to online review, this restaurant always full, and the service are not that good, so we had this in mind, and planned only to focus on the food and not the service. However, when we reached there after 8pm, which was supposed to be the peak hour, we were lucky to have a seat right after we arrived, but not so for those who came after us. The services we had were not bad that night, the complaint on not getting water/tea did not happened on us~

這裡最棒的, 就是超大份量! 不管是壽司卷還是生魚片, 都是材料十足. 價格和其他日本餐廳差不多, 可是搭上這種份量就很划算了, 尤其生魚片的厚度, 幾乎就是別家餐廳的兩倍嘛!

The best thing about here is, the portion! No matter is sushi roll or sashimi, the quantity of material is so full. Although the price is quite similar to other Japanese restaurant, it is definitely very cost-effective if pair with this portion, especially the sashimi, almost double the size of other restaurants!

我們點了五道 - Assorted Sashimi (小), Lion King Roll, Dynamite Roll, Tuna Tataki, Salmon Skin Handroll
We orderd five dishes - Assorted Sashimi (small), Lion King Roll, Dynamite Roll, Tuna Tataki, Salmon Skin Handroll

Assorted Sashimi


非常厚的生魚片, 很新鮮好吃~
Super thick sashimi, very fresh and delicious~


Lion King Roll & Dynamite Roll


Lion King Roll是招牌菜之一, 它其實是California Roll外面一層厚厚的烤三文魚和美乃芝醬, 我最愛這!
Lion King Roll is one of the famous dish in the restaurant, actually it is California Roll wrapped with a thick grill salmon and mayonnaise sauce, I love this the most!

Dynamite Roll是老公最愛, 因為他喜歡spicy tuna, 這可真的有點辣哦~
Dynamite Roll is hubby's favourite, as he likes Spicy tuna, and this is really a SPICY roll~


Tuna Tataki


我們不確定這是甚麼, 所以點來嘗. 基本上就是一塊表皮微熟的tuna切成薄片, 然後配上一些沾醬吃, 我們不太喜歡它的沾醬, 有點太酸, 還是比較愛tuna生魚片.
We were not sure what is that, so just ordered to try. Basically it was a chunk of tuna with outer layer slightly cook, then sliced into thin pieces, and eat with some special sauces, we don't really like the sauces as too sour for us, we still love the original tuna sashimi.


Salmon Skin Handroll


這是我第一次吃到裡面塞到那麼滿三文魚皮的手卷, 超誇張的! 很脆口, 可是味道我覺得和一般的不太一樣, 也說不出來甚麼地方不同. 對了, 吃了之後才記得忘了拍照 :P
This is the first time I ate a handroll that stuffed with so many salmon skin, its superb! Very crispy, but I felt that the taste was different from the normal salmon skin handroll, can't really explain what was the difference though. And yes, I forgot to take the photo of this :P

吃了這一頓超級飽的一餐, 我們已經把它定為一定還會再來的餐廳了! ^^
After this super full meal, we have marked it as "definitely will come back again" restaurant! ^^ Pin It Now!

Friday, September 9, 2011

Happy Anniversary~

不知不覺, 已經結婚兩年了~

謝謝你一直的照顧和包容, 很開心生命中有你的陪伴, 分享喜怒哀樂.

希望往後的日子一樣甜蜜, 或者更加甜蜜 ^^

老公, 週年快樂~


后記:

週年慶的週末, 去了Reno慶祝, 看熱氣球比賽, 吃好的~
很意外在我們用餐的Atlantis Steakhouse, 竟然送我們寫上Happy Anniversary的甜點, 最後還送我們兩塊小蛋糕說明給我們明天早點的, 哈~

(很高興老公記得我很想要看熱氣球, 所以當同事告訴他這個比賽時, 他就安排了這一次行程, 最愛你老公 ^*^)


Pin It Now!

Leda Scarf 勒達蕾絲圍巾

這條圍巾已經織了幾個月了, 不是因為款式複雜, 而是由於它的長度, 加上用的是很細的sock yarn, 費時很長, 中間為了解悶, 還鉤織了許多的鉤織娃娃, 所以直到現在才完成.

I've been knitting this scarf for few months, not because of the complexity of the pattern, it was due to its length and the thin sock yarn I'm using which were very time-consuming, and in the middle of it, made a few amigurumi to get out of bored, so until now finally it was finished.

已經收藏這個勒達蕾絲圍巾款式一段時間了, 而會開始動工的原因是, 在我的毛線堆了, 找到了以前在多倫多買下的sock yarn, 當時因為很舒服柔軟顏色也很漂亮所以買了(粉紅和粉紫), 但是只各買了一卷, 並不夠織一雙襪子, 也不可能織一雙不同色的吧, 所以一直呆著, 直到看到這個款式, 突然想到可以混色編織, 就動工了!

I've bookmarked this Leda Scarf pattern for some while, the reason for starting it now was, in my pile of yarns, I've found the sock yarns that I bought while I was in Toronto, during that time I bought them because of their softness and cute colors (pink and purple), but I just bought one skein for each, not enough for a pair of socks, and would be awkward to make a pair of different colors too, so they were kept lying there until I thought of mixing them together for this scarf pattern, and so it all started!

Leda Scarf

原本的款式是有三段, 但是我只有兩個顏色, 而且也覺得三段有點寬, 所以就改成兩段, 一段一色.

The original pattern is having three segments, but since I have only two colors, and also feel like three segments will be a bit wide, so I've changed it into two segments, each for a color.

它的款式不難, 織了幾行就可以不看款式圖繼續了, 唯一要注意的是到結尾的時候款式有點不一樣, 要小心不要織錯.
除此, 由於這個款式是分兩部分完成, 所以在連接第二部分時要小心不要掉線.

This pattern is not difficult, after knitted a few rows can continue to knit without looking at the pattern, the only thing to note was the pattern is a little bit different at the end, so be cautious not to knit them wrongly.
Besides, since this pattern is completed in two parts, so be careful not to dropped a stitch when combining the second part.

根據設計師提供的小建議, 由於這條圍巾編織完後會容易捲曲, 所以建議使用可以用燙斗輕燙定型的毛線.
The designer's little suggestion was, try to use yarn that can be lightly ironed after blocking as the scarf will tend to curl in when finish.

以下是我的成品喔, 不過懶惰所以還沒熨燙過 ^^
Below are the photos of my finished item, but was too lazy to iron it yet ^^


Pin It Now!

Easy No Bake Cheesecake 簡易無焗芝士蛋糕

我愛芝士, 所以一直都很想親手弄個芝士蛋糕, 但是知道自己的烘培工夫有限, 所以一直沒動手, 可是那天心血來潮, 在網上竟然給我找到一個超級簡單又無須焗烤的芝士蛋糕食譜, 就立刻購買材料, 在勞動節的長週末做了我人生第一次的芝士蛋糕~

I love cheese, that's why I always wanna to make a cheesecake by myself, but I know my baking skill level, therefore never start the move, but then that day the mood suddenly striked, and I found a super easy and no bake cheesecake recipe online, so without any delay I've bought the materials needed, and made my first ever cheesecake during the Labor Day long weekend.

Easy Cheesecake #1

由於真的超級簡單, 就是把材料混合, 再冰凍就完成, 所以不一會兒就搞定了.
可是賣相不太好, 因為那些鋪底的全麥餅乾碎凹凸不平的, 鋪上芝士混合液後還留有空隙, 而且蛋糕表面也沒辦法抹滑.
雖然如此, 味道卻很好喔!

Since it is really an easy recipe, just mixed the ingredients and fridged it, so it was done in short time.
However, the look wasn't that good, as the graham cracker as pie crust was uneven causing after I spooned in the mixture there was a lot of gap underneath, and I couldn't smooth the surface of the cheesecake too.
Nevertheless, the taste was delicious!


我原本想要購買現成的撻皮鋪底, 因為看朋友弄過, 好看又方便吃, 可是在Walmart找不到, 所以才用全麥餅乾.
下次再弄時, 還會在上面加些水果或是巧克力粉末, 應該會好看些~

I was thinking to buy the ready made tart shell as the pie crust, as I saw a friend's cheese tart made with that, neat and easy to eat, but couldn't find that in Walmart, so I used the graham cracker instead.
So next time when I make this again, I'll try adding some fruits or chocolate powder on top, I believe it'll look better~

Pin It Now!

Thursday, September 1, 2011

Amigurumi Pillow Pal Puppy 趴趴狗抱枕鉤織娃娃

上次鉤織了長頸鹿後, 就決定要弄K4TT的另一個可愛抱枕娃娃 - 趴趴狗~ (當然, 感謝也是免費圖案哦!)

Last time after I've crocheted the Pillow Pal Giraffe, I've decided to make another K4TT's design - the Pillow Pal Puppy~ (of course, thanks for another FREE pattern!)

Pillow Pal Puppy


第一次看見這只狗狗時, 讓我想起了以前我也有的一只的粉紅色大狗娃娃, 那時我很愛抱著軟軟的它睡覺, 可是現在已經想不起它去了那裡, 所以當決定要鉤織它時, 就選擇了粉紅色毛線, 然後配色就給選了上次鉤織中國娃娃用的紅色毛線.

The first time when I saw this puppy, it reminded me about the big fluffy pink puppy doll that I used to have, which I loved to hug to sleep, but can't remember where it had gone now, so when I decided to crochet this, I've chosen pink yarn, and for the matching color I've chosen the red fancy yarn I've used for China Doll.

這一次娃娃的脖子我是照著圖案鉤織, 不過最後並不是壓扁縫合, 而是讓它保持圓柱狀.
眼睛呢, 也是使用玩具眼.
不過, 只一次有點不滿意的是把脖子和頭部連接處定位太高了, 所以大頭沒辦法撐起來, 一直垂著.

This time, I've followed the exact pattern instruction for making the neck, but did not make it flat, instead keeping it at tube-shape.
As for eyes, I still use safety eyes.
However, the only thing that I'm not that satisfy with was attaching the neck and head at a little too high position, so cannot really hold the big head, and just dangle there.

完成後的作品, 除了頭部, 身體和腳完全不像我以前的大狗娃娃, 由於圓圓的身體和短短的腳, 反而有點像烏龜, 哈~
雖然如此, 整體來說, 它還是一個可愛的娃娃哦!

The finish work, except for the head, the body and legs looked totally different from my old big puppy doll, as the round body shape and short legs, it does looks a bit like a tortoise, haha~
However, overall it is still an adorable doll!


兩個趴趴一族 two pillow pal friends


Pin It Now!

Friday, August 26, 2011

Amigurumi Pillow Pal Giraffe 長頸鹿抱枕鉤織娃娃

當我開始對鉤織娃娃有興趣時, 就在Lion Brand的網頁 (http://www.lionbrand.com/patterns/80449AD.html) 找到這個Georgina的長頸鹿鉤織圖案, 可是當時對鉤織還不熟悉, 所以就沒有動手, 可是就對可愛的長頸鹿娃娃產生了興趣.

When I started to have interest in amigurumi, I've found the crochet pattern of Georgina the Giraffe on Lion Brand's website (http://www.lionbrand.com/patterns/80449AD.html), but by then I was not familiar in crochet yet, so didn't take the move, however, I've gained interest in the cute giraffe doll.

做了幾次個人蠻滿意的鉤織娃娃後, 就重新想要鉤一隻長頸鹿, 雖然已經知道Lion Brand的圖案, 可是就是覺得可愛度不夠, 曾經在某網頁看到過很可愛的圖案, 可是需要購買, 為了省錢就算了, 繼續尋找. 終於皇天不負有心人, 讓我找到這個既可愛又免費的鉤織圖案, 真是太感謝這位博客了!

After a few attempt of making amigurumi which I'm quite satisfy with, so I would like to try to make a giraffe now, although I've gotten the pattern from Lion Brand, just thought that it wasn't cute enough, I've seen a really cute one on some website but need to pay, so just give up and keep searching, and finally, I've found this super cute and FREE pattern, many thanks to K4TT!

Pillow Pal Giraffe

這個鉤織圖案不算難, 只是需要長一點的時間, 因為比我以往做的娃娃大許多. 它是屬於抱枕型的, 大小剛好適合抱在懷中.
我稍微修改了一點點圖案, 把眼睛換成玩具眼, 然後脖子也從原本的扁狀換成圓柱狀, 覺得這樣比較可以托得住那顆大頭=D, 最後的成品我個人覺得好可愛唷~

This pattern is not complicated, but it needed longer time to complete, as is much bigger than the amigurumi I've made before. This is a pillow style doll, so its size is just nice enough to be hugged.
I've done some slight modification on the pattern, changed the eyes with safety eyes, and also changed the original flat neck into tube shape, as thinking that this could better support the big head =D, and I think the final look of this little fellow is so adorable~

經過這次成功嘗試, 我已經迫不及待的想要做這個博客的另一個免費圖案 - 趴趴狗抱枕鉤織娃娃了!
After this successful attempt, I can't wait to try the other free pattern from K4TT - Pillow Pal Puppy!


Pin It Now!

Thursday, August 11, 2011

Amigurumi China Doll 中國娃娃鉤織娃娃

那天上網找尋靈感時, 看到有人鉤織日本和服娃娃的照片, 看到那紅紅的和服, 頓時勾起想要弄個中國風娃娃的想法.

二話不說, 立刻動身去購買紅色毛線, 我買到的是一卷帶有一些閃亮亮絲線的毛線, 覺得很漂亮又便宜, 還有就是已經被我用完的膚色毛線.

我的中國娃娃的初步概念是身穿紅色旗袍, 還有紮上兩個髮髻.
有了概念, 就要開始動工了...

完成我的身體部分後, 雙腳我也給她鉤上紅色毛線, 就好像穿上布鞋的樣子.
好了, 現在到了不知從何下手的旗袍了....
就如之前的連帽衫女孩, 我想要儘量減少縫合處, 所以想啊想啊, 就用以下方法完成了, 可是我覺得不滿意, 尤其是前面一片比後面那片窄, 看上去胖胖的臀部(=P), 前面斜斜縫合處的點綴品也很難看, 可是都已經完成了, 就很懶惰拆掉, 也不想浪費毛線, 算了吧, 等完成全部再看看...


接下來就是我覺得整個娃娃最可愛的地方, 那就是兩顆大大的髮髻!~
可是, 弄這個髮型卻是最最最費時的, 不像之前的女生娃娃, 只要在髮際串上毛線即可, 這個還要在中間也得串上才行, 不然左右分界線處不就光頭了嗎, 哈~
串完後, 紮上一對兔耳朵, 然後就開始動作鉤可以包住這兩束頭髮的套套了.
我用紅色毛線開始, 作為髮髻紮綁的絲帶, 然後換成髮色完成.
套上後, 再縫在腦袋瓜上, 兩顆大大的饅頭就種在頭上了, 我好喜歡哦~

還好由於有了這顆可愛的大頭, 才可以把視線轉移離開那不完美的旗袍.

眼睛部分, 想了好久, 決定弄個東方人常有的鳳眼, 來突顯中國風韻, 嘻嘻!

這一次, 還給加了個小扇子綁在手掌上, 甚至來了一張邊歌邊舞的照片呢, 哇哈哈~


Pin It Now!

Friday, August 5, 2011

Amigurumi Hoodie Girl 連帽衫女孩鉤織娃娃

哈哈, 就如我自己所說的, 我不喜歡重複同樣造型, 所以雖然想要重新做一只粉紅小妞收藏, 但是邊鉤邊想的, 結果就出了這個不一樣的連帽衫女孩了~

我一直都很想弄看看連帽衫, 因為覺得娃娃穿上會很可愛, 可是娃娃穿的卻不能和真人穿的做法一樣, 覺得需要one piece完成以減少縫合口, 不然會太厚. 所以根據構思加想像, 就如以下的步驟完成了我的連帽衫~


由於我的都是大頭娃娃, 所以這件連帽衫是套上身體部分後, 才做上图最後第二步驟的縫合, 也因如此, 衣服穿上後就脫不下來了, 哈~

除此之外, 我還加了一些時尚元素, 比如泡泡襪, 增加娃娃的可愛度, 還有增加了娃娃的細膩度, 那就是手掌部分有了拇指哦 (嘻嘻!), 眼睛部分也給加了眼睫毛呢~

最後就是最費時的頭髮部分, 基本上是和粉紅小妞做法一樣, 可是我用了比較長的深褐色毛線, 頭頂打結部份也比較整齊了, 甚至紮上馬尾後, 更把部分毛線拆開, 看上去就像燙了一頭捲髮似的~

出來的娃娃我很滿意呢~
很可愛, 很時髦, 哈哈, 還自誇呢 ^.^
你們覺得呢?


Pin It Now!