Showing posts with label crocheting. Show all posts

Monday, July 16, 2012

Grand opening of my Etsy shop: amilovers ~ 新張營業!

After the encouragement from friends and family on the crafts that I've made, finally I've set up and opened my first ever online shop through Etsy - amilovers, selling the toys/dolls (amigurumi) I've crocheted stitch by stitch by myself!

I'm so excited about it and hopes to see some customer flows coming in soon, wish me luck!

經過一直以來朋友和家人對於我的手作的鼓勵與支持, 我終於通過Etsy開始了我人生第一間的網路商店 - amilovers, 賣出由我親手一針一目縫製的娃娃!

對此心裡非常興奮, 也希望不久的日子裡就可以看到源源不絕的客戶(哈, 好貪心喔!), 祝我成功吧!

amilovers @ Etsy


Welcome to visit/like my Facebook page too, just click on the link on the left or this link below:

也歡迎大家光臨我的面子書頁面, 只需點擊右邊的連結, 或以下的網址:

amilovers @Facebook
https://www.facebook.com/cloudyamilovers

Follow me on Twitter @amiloverscwy
請在推特跟蹤我吧 @amiloverscwy 
Pin It Now!

Friday, June 15, 2012

Amigurumi Piggy Memo Clip 豬豬便條夾鉤織娃娃

From the crochet book on Teddy Bear, there is a pattern on a lying dog memo clip which I've always wanna to try, but I have not able to get the suitable clip to be used, so in turn I substitute with a smaller hair clip, and modified the design from doggie to piggie, which will be less complicate, just to try out how things turn out if using a smaller clip.

在<就愛新歡泰迪熊Teddy>裡, 有一款趴趴狗便條夾的鉤織圖是我一直想嘗試的, 可是一直沒找到合適的夾子, 於是我就用較小的髮夾替代, 然後更改了設計, 从趴趴狗改成比較簡單鉤織的趴趴豬, 想說先試試看用小夾子的效果.

The crochet part of this memo clip was easy, the hardest part would be attaching the clip to the mouth of the piggy. Since the clip is small so I have to tie it at the center part so it won't shifted, but the length of it was much longer than the mouth, so half of the clip has to be stuffed into the head part. And this clip has a narrow surface, not like the wide surface of the clip used in the original design, so after the clip has been installed into the head, it was not able to press open the clip, however, it is still able to slip any name card or memo pieces into the mouth without falling out.

這個便條夾的鉤織部分蠻簡單, 艱難的是把夾子系在嘴巴的部分. 由於夾子蠻小, 所以必須把它綁在中間以防移位, 可是它的長度卻超出嘴巴的部分, 只好把長出的夾子藏身於頭部. 同時由於這是個窄夾子, 不像原本設計中使用的寬面夾子, 所以當安裝好在頭部裡面後, 並沒有辦法把它按開, 可是, 還是可以輕易的把名片或便條紙塞進嘴巴而不掉落.

Although this is not consider a successful attempt, the big piggy head and nose are still adorable.

雖然這不算是個很成功的嘗試, 可是它那個豬大頭豬大鼻卻還是滿可愛嘀.


I've given away this piggy as a gift to my friend in Taiwan, together with her mate - the Bee Piggy. I believe the new owner will treat them very well!
我把這個豬豬便條夾送給了一位遠在台灣欣賞它的主人, 同時還給它做了個伴呢 - 蜜蜂豬豬. 我相信你們的新主人會對你們很好的!


Pin It Now!

Amigurumi Mini Shiba 迷你日本柴犬鉤織娃娃

Before I knew how to crochet, I've once bought a mini crocheted doggie from a street fair, only about an inch tall, super cute and amazed by the skill to make such an adorable craft. After I started my amigurumi journey, I'm not sure why but I've never come across any doggie design. So that day when I was searching for crochet books, this one with lots of cute doggie design finally reached me.

在我還沒有懂得鉤織之前, 我曾經在一個市集裡買過一隻迷你鉤織狗狗, 只有大約一寸高, 非常可愛, 同時也非常驚訝於能夠做出如此精緻手藝的技術. 當我開始了我的鉤織娃娃旅程後, 不知為何從來沒有遇上過任何狗狗的鉤織圖. 直到那天在找尋鉤織書時, 終於碰上了這本充滿著各式各樣可愛狗狗的書本 - <鉤針狗狗的每一天>.

After finished reading the book, then only I found that actually it is not as hard as I thought to crochet a mini dog. There is a basic model for all the doggies, but slight changes in here and there for different breed. The book also introduced three poses, the stand pose, the sit pose and the lie pose, and among them, I love the sit pose most.

看完了整本書, 我才發現原來要鉤織迷你狗狗並不如我想像中的難. 全部的狗狗都有一個基本的造型, 不過不同的品種就有些微的變化. 書中還提供了三種姿勢, 站姿, 坐姿和趴姿, 而其中我最喜歡的就是坐姿.

Although there is a lot of design available, the one I've chosen was the Shiba, and this was also the only pattern with detail step to step. Since I'm using the common worsted weight yarn with a bigger hook, and not the fingering yarn, so the size of doggie I've made was much bigger than the mini dog I've bought, around 3" tall, though it is still a handsome doggie.

雖然書中有許多的款式, 我選擇了日本柴犬, 而這個也是唯一一個有詳細步驟的款式. 由於我使用了一般粗的毛線配上大號鉤針, 而不是細毛線, 所以我的鉤織狗狗比購買的那隻大許多, 大概有3寸高, 可卻依然英姿非凡呢.


Pin It Now!

Amigurumi Patchy Piggies 拼布豬鉤織娃娃

After completed a few Palmie Bear couples, wanna to change the mood, so just grab a crochet book from the bookshelf and wanna to make something quick and yet, must be cute too.

完成了幾對掌心熊系列娃娃後, 想要轉換心情, 於是隨手拎起書架上的一本鉤織書<愛不釋手的毛線娃娃>, 想要做一個即快, 但又必須可愛的作品.

After flipping through the pages, instantly attracted to the little boar amigurumi, as I've always wanna to make a piggy doll but always distracted by other doll designs, and then modification to them, so finally this time I must make up my mind to do it.

翻了翻內頁, 就看上了可愛的山豬娃娃, 主要也是很久以前就想要做個豬娃娃, 可是一直被其他娃娃造型吸引, 還有延續的款式變化, 所以這一次無論如何也要動手了.

I followed the basic model as per the book, but skipped the sharp teeth, and replaced the round toy eyes with smiley eyes sewn with yarn, then made the curly cute tail, finally added crocheted patches on the plain body, so my first ever Patchy Piggy was completed.

基本造型和書上一樣, 可是我免去了山豬的尖牙, 把原本圓圓眼珠子換成毛線縫上的咪咪笑眼, 把尾巴做成可愛的卷卷狀, 最後在略顯單調的身體縫上也是毛線鉤織的拼布, 就完成了我第一隻的拼布豬.

Wonder whether due to the couples amigurumi that I've made recently, after the first piggy, can't wait to make another one to accompany it.
And so, by using the same colors of yarns but different combination, the second Patchy Piggy was born.

不知道是不是做多了情侶娃娃, 完成了第一隻豬豬後, 就立刻想要做另一隻來陪伴它.
於是, 就運用了同色毛線組但不同的配搭, 第二隻拼布豬娃娃也誕生了.


The fat and round piggies, even hubby said they are cute~
What do you think?

胖胖圓圓的小豬, 連老公看了也說可愛~
你說呢?

Pin It Now!

Saturday, June 2, 2012

Amigurumi Angel & Devil Palmie Bear Couple 天使與惡魔情侶掌心熊鉤織娃娃

Please welcome another bear couple who newly join the Palmie Bear village~
Let me introduce you to the sweet pinky Miss Angel, and her beloved gentle pinky Mr Devil.
*clap *clap *clap

請掌聲歡迎最新加入我們掌心熊村莊的情侶熊娃娃~
讓我來介紹, 甜美粉紅天使小姐和她摯愛的和善粉紅惡魔先生.
*拍掌 *拍掌 *拍掌


When the angel meets with the devil, she melts his heart, and brings him back from the evil hell.
Since then, Miss Angel likes to fly around the clouds with her cutie little white dress and flapping her angel wings, looking down to Mr Devil who likes to enjoy the calmness during the sunset while wearing his dark cloak.

當天使遇上惡魔, 她溶化了他的心, 把他從萬惡的地獄帶回來.
從此, 天使小姐就喜歡穿著她可愛的小白裙在雲端飛舞, 輕拍著她的天使之翅望向穿著黑披風的惡魔先生, 在喜歡享受著寧靜的黃昏日落.

Angel and Devil, just like love, you can be in heaven for a minute, but the next will fall into hell, up and down in cycle, but this is the wonderful of love, isn't it?

天使與惡魔, 就好像愛情一樣, 前一秒可以是天堂, 下一秒卻可以是地獄, 上上下下的迴旋, 但這就是愛的奇妙, 不是嗎?


Now available to be purchased at Etsy!
現在可以通過Etsy購買這對娃娃喔!
Pin It Now!

Thursday, May 10, 2012

Amigurumi Sailor Palmie Bear Couple 水手服情侶掌心熊鉤織娃娃

Just like I promised, another Palmie Bear couple were born~
This time, they are dress in the cute sailor costume, and go sailing...

就如之前期待的, 又一對掌心熊娃娃誕生囉~
這一次, 它們穿上可愛的水手服, 出海航船去嚕...

For the sailor costume, the hardest part was to crochet the front part of the collar, and the result from my limited skill, it looks ok from far, but a bit rough if observed from near....

這一次的水手服, 最難的地方就是鉤織那片衣領的前半部, 從我有限的技術做出來的結果, 遠看可以, 近看則有點粗糙啦....

But who cares, they are still a lovely cute couple!

不過管他呢, 它們依然是一對可愛小情侶呀!


Now available to be purchased at Etsy!
現在可以通過Etsy購買這對娃娃喔!
Pin It Now!

Monday, May 7, 2012

Amigurumi Beach Wear Palmie Bear Couple 沙灘裝情侶掌心熊鉤織娃娃

Continue to unleash my creativity, and also with the past experiences on the little amigurumi dolls I've made, this time I've created a couple partner - the Beach Wear Palmie Bear Couple!~
Why names as Palmie? That's because they are only palm-sized big~

繼續發揮創意, 以及累計以往那些小型鉤織娃娃的經驗, 這一次創造出了一對情侶搭檔 - 沙灘裝情侶掌心熊!~
為何名為掌心熊? 那是因為它們只有掌心般大小而已哦~

JJ often asked why is that my amigurumi's arms and legs were so long, so this time I slightly changed the style, gave them a pair of short and fatty arms and legs, topped with a big head, kawaii ne~

以前JJ常說我的娃娃怎麼都那麼手長腳長的, 所以這一次稍改作風, 給了它們一雙短短胖胖的手腳, 配合大大的腦袋, 卡哇伊呢~

For the guy version, beside a simple swimming trunks, also crocheted a life preserver as his accessories;
For the girl version, the cutest would be the little piece of bikini, and the blush on the face, how could anyone move his/her sight from this lovely bear?

男生版的, 除了那簡單的泳褲, 還給它織了個救生圈當配飾;
女生版的, 最可愛的莫過於那小小件的比基尼泳裝了, 還有那臉上腮紅, 讓人怎麼舍得把視線拿開呢?


I'm looking forward in creating more Palmie Bear series, coming soon...

我盼望著能夠創造更多的掌心熊系列, 敬請期待哦...

Now available to be purchased at Etsy!
現在可以通過Etsy購買這對娃娃喔!

GREAT NEWS! Beach Wear Palmie Couples have been bought and found a new home!
好消息!沙灘裝情侶掌心熊已經被購買, 找到它們的新家了! 
Pin It Now!

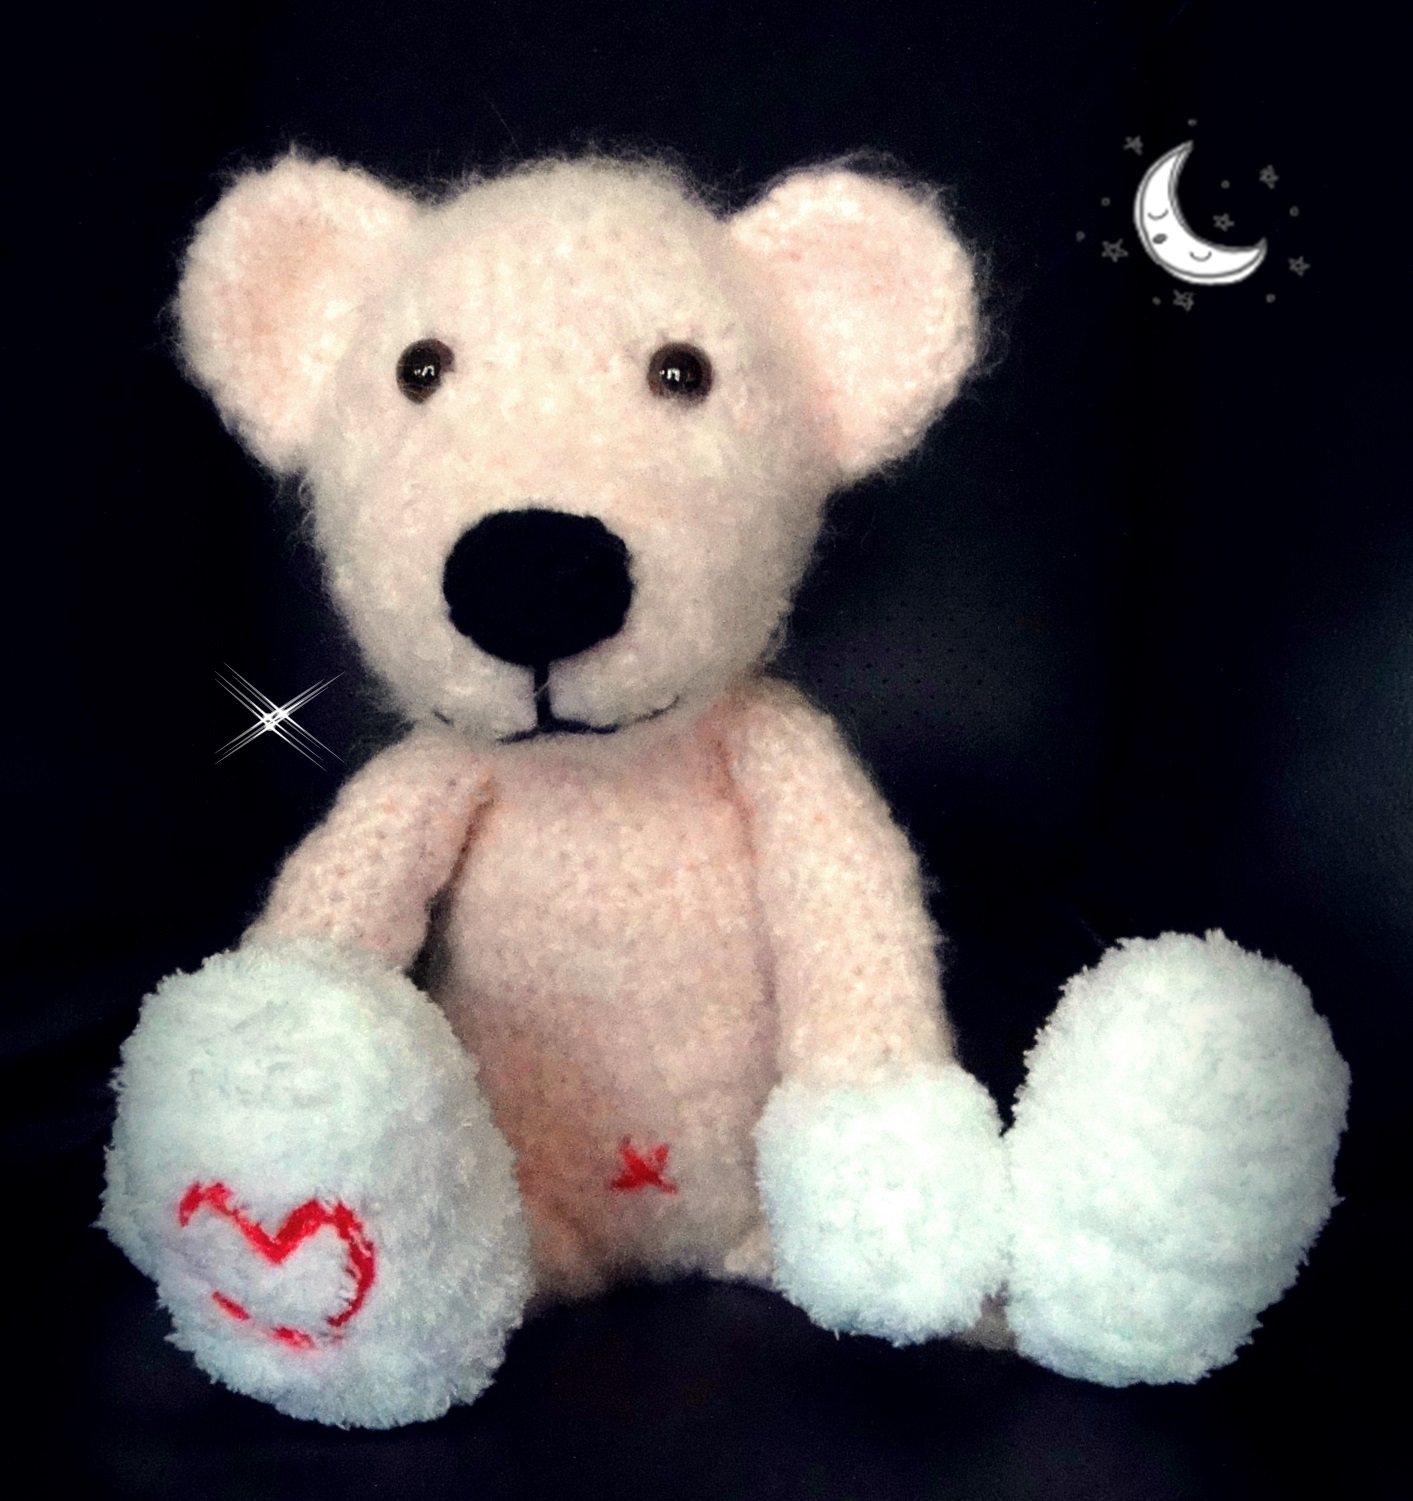
Amigurumi Sweetheart Pink Bear 甜心粉紅熊鉤織娃娃

After two successful attempts of crocheting cute bear dolls, I have now more confidence in creating more of them.

經過兩次成功鉤織出可愛的玩具熊, 現在的我更加有信心去做更多的熊熊了.

This time, I've chosen the same yarn as Baby Bear Paton Divine, but the color is Chantilly Rose, a light pink color.
The mouth of my last two bears was crocheted with normal worsted weight yarn, but this time, I used the same yarn as the body, and changed the yarn for palm and feet into the same as for Snuggly Polar Bear, so the whole teddy is just a furry little fellow, so adorable!

這一次的熊熊, 我選用了和熊寶寶同樣的毛線總類Paton Divine, 但是顏色則是淡淡的粉紅色.
上兩次的泰迪熊的嘴巴都是用普通毛線鉤織的, 而這一次的, 我就使用和身體同樣的毛毛線, 而手掌和腳掌則使用軟軟北極熊同樣的毛線, 所以整隻熊熊都是毛茸茸的, 可愛極了!

Besides, I've added a little detail for it, stitched a bright pink love on its right foot, and also a tiny belly button, create some personality out of ordinary, haha~

除此, 我還使了一點小心機, 在右腳掌上繡了個鮮粉紅愛心, 還給了它一個小肚臍眼, 讓它在平淡中增添一點個人特色, 哈~


Finally, a family portrait time!
現在, 來個家庭大合照吧!


Now available to be purchased at Etsy!
現在可以通過Etsy購買這只熊熊喔!
http://www.etsy.com/listing/101371112/sweetheart-pink-bear-handmade-crochet
Pin It Now!

Thursday, April 26, 2012

Amigurumi Snuggly Polar bear 軟軟北極熊鉤織娃娃

Last time when I bought the yarn for Baby Bear, I also bought a big ball of Bernat Pipsqueak which was on sell in Jo-Ann, very comfortable and soft white yarn, the weak point of this yarn is the fur kind of easy to pull off, and due to its texture, it is very hard to identify each stitch for crochet, so I just did it by instinct.

上次買毛線做泰迪熊寶寶時, 就同時買了一卷Jo-Ann在特價中的Bernat Pipsqueak毛線, 非常舒服又柔軟的白色毛毛線, 可是缺點就是毛毛比較容易脫, 而且也由於它的毛毛, 鉤織時很難看見針目, 只好憑感覺鉤.

This Snuggly Polar Bear also took me three days to finish, and the difference between this and Baby Bear, were the shape of the mouth piece and the length of the doll, and the hard part was to sew the nose.

這隻軟軟北極熊同樣也是花了我三天的時間完成, 和熊寳寳不一樣的是嘴型和娃娃長度, 還有比較難的是用毛線繡上鼻子的部分.

Since I used a different color of yarns, mine is totally different kind of bear than the Coffee Teddy Bear introduced in the book, I transformed it into a Polar Bear ^_^ I've added some length to its arms and legs, and widen its waist a bit, since I felt the original was a little too thin.

因為毛線顏色的差別, 我的這一隻和<就愛新歡泰迪熊Teddy>裡面所教的咖啡毛毛熊就完全不一樣總類了, 它的熊熊被我變成北極熊了, 哈~ 而且我也加長了它的手腳長度, 身體的寬度也給我稍微增肥了, 因為覺得原本的似乎太瘦了點.

The teddy in the book was having a scarf, so I've made one especially for my Polar Bear too. I've chosen bright pink and blue, looks very striking when wear around its white fur!

書上的毛毛熊有一條圍巾, 所以我也給我的北極熊量身訂做了一條. 選擇鮮豔的粉紅和藍, 圍在白色的毛毛上, 很出色呢!


Took a few photos for both Baby Bear and Snuggly Polar Bear together, and they seem to have a very close brotherhood feeling, don't you think so?

為熊寶寶和軟軟北極熊一起拍了幾張相片, 它們看上去就像感情很要好的哥兒們呢, 你們覺得呢?


Now available to be purchased at Etsy!
現在可以通過Etsy購買這只熊熊喔!
http://www.etsy.com/listing/101369663/snuggly-polar-bear-handmade-crochet-doll Pin It Now!

Monday, April 23, 2012

Amigurumi Baby Bear 熊寶寶鉤織娃娃

Few days ago I finally received the crochet books I've ordered through a Taiwanese online store 'Books.Com.Tw', and one of those that I'm really looking forward, is this book on crocheting teddy bears (no English version available), those teddy bears shown in the book look so cute, and all are just make by crochet, the patterns also look understandable, so the next day I received the book, I started making one.

前幾天剛收到從台灣博客來訂購的鉤織書本, 其中讓我最期待的, 就是這本<就愛新歡泰迪熊Teddy>, 裡面的熊熊看起來都很可愛, 而且都只是用鉤針就能夠做出來的, 鉤織圖樣看上去也沒有很難, 書到後的第二天, 就立即動手開工了.

Since I've never had any attempt in making a teddy, so I wanna to first try a basic teddy model, the one I selected was featured on the cover of the book, the Little White Teddy.

想說沒有嘗試過織泰迪熊, 所以就選擇了比較基本款的熊熊開始, 被選上的就是封面上的白色皮皮熊~

The book was published in Taiwan, and I was not sure about the yarn specified in the book, so I selected the Patons Divine, a soft mohair look yarn in Soft Earth color, and did not checked the gauge, I was thinking that the worst of it will only affect the size of the teddy, which turned out to be a little mistake here, I'm not sure whether is the yarn caused the height seemed shorten or the width seemed widen, my teddy's head seems not as round as the one shown in the book, and the body also seems smaller, but luckily, the final look of the teddy bear is still adorable~

由於該書是台灣出版, 所以書上註明的毛線總類我不太清楚, 所以我就自己選擇了Patons Divine, 大地色的毛毛線, 也沒有去檢查標準尺寸, 想說頂多只是娃娃大小的差異而已, 結果果然有影響. 不知道是高度縮短了還是寬度加長了, 我的泰迪熊的頭部似乎沒有書本上的圓, 身體也比原版的小. 不過還好的是, 做出來的成品還是很可愛嘀~

The furry and yet thin body, is so comfortable to hug, and it looks just as lovable as a little baby~

熊熊毛毛卻嬌小的身體, 抱起來很舒服呢, 看上去就如小小貝比那般惹人疼愛, 哈~

The tiny-tee was borrowed from another bear friend 小小T是從其他熊熊借穿的
 

Now available to be purchased at Etsy!
現在可以通過Etsy購買這只熊熊喔!
Pin It Now!

Sunday, April 22, 2012

Amigurumi Amineko Cat 貓貓鉤織娃娃

Recently I was searching online for some crocheting books which teaches the pattern on cute amigurumi, I mean really cute one, so I came across this book <Hello My Name is Amineko: The Story of a Crafty Crochet Cat>, which this interesting kitty has so many expressions and body language. However, since there is only one pattern of kitty, and the price of the book is not cheap, so I just let it go. But who knows by accident, I found out that there is free pattern available online for this kitty (**copyrights are reserved by Nekoyama**), so happily I've made one Amineko for myself~

最近在網上想要找尋一些專門教導製作可愛鉤織娃娃的書本, 我是想找真的真的很可愛的那種, 結果找到這本<養一隻編織貓>, 裡面的那隻有趣貓咪真是多表情和肢體語言啊. 可是由於只有一種貓咪的圖樣, 而且書本價錢不算便宜, 所以就略過了. 誰知無意中卻讓我在網上找到這個貓咪的免費圖樣(**版權屬於Nekoyama**), 當然就很開心的做了一隻給自己.

Amineko Cat 編織貓
(This is a Japanese website, the pattern link located on the right under the name "pattern of crocheted Cat with diagram (Amineko)", click on it will open a new page, then click on the same name again will bring you to the pattern page with detail steps.)
(這是一個日本網站, 製作圖樣的網址在該網頁的右邊, 名為"pattern of crocheted Cat with diagram (Amineko)", 點擊後會打開新頁面, 再點擊同樣的名稱, 就會去到有詳細步驟的製作圖樣.)

The steps aren't difficult, but I'm not sure why the Amineko that I've made, looks more alike to Pink Panther (but only mine in gray instead of pink), although I followed exactly the same steps, I guess maybe sometimes the stuffing and placing of each parts will contribute to the "make-over".

製作的步驟並不難, 可是我不了解為甚麼我的編織貓, 卻看起來像是粉紅豹(只是我的是灰色而不是粉紅色), 雖然我完全根據一樣的步驟, 我猜或許有時填充棉花和縫合各個部位時也會帶來"改造"吧.

Learn some tricks from the book on posing the cat for photo shooting~

從書中偷學了幾招貓咪擺普士來拍拍照~


Pin It Now!

Amigurumi Cutie Tarts Cellphone Straps 可愛毛線水果塔吊飾

That day I was flipping through my stack of books on knitting and crocheting, and found this book <So Sweet>, immediately attracted by the cute and colorful dessert on the cover, wonder why I did not make anything from the book after I've got it for so long, and so my craving for crocheting amigurumi started again, and I believe such a small dessert will not take me a long time to finish one.

那天翻動我那堆棒針鉤針的書本, 看到這本<鉤織甜點>, 就被封面上可愛彩色的俏皮甜點所吸引, 還蠻奇怪為何買了那麼久卻還沒動手做個書內的作品, 於是鉤織毛線娃娃的癮又開始犯上, 小小一個點心, 相信不一會兒就可以完成一個的.

The project that attracted me, was different kind of fruit tarts.
The first one I've made was peach tart, layered with white and yellow peach slices, topped with two tiny mint leaves. Since the yarn colors I've used were not striking enough, and made it feel so tasteless, so I added a little raspberry between the mint leaves. Now it looks lovely~

被我看上的, 是各種各樣的水果塔.
第一個動手做了桃子塔, 塔面鋪上白桃和黃桃片, 中間兩片小小薄荷葉. 由於我使用的毛線顏色沒有很出色, 所以覺得有點黯淡無味, 於是就在薄荷葉上加了顆小小覆盆子. 現在看起來就可愛啦~


The second one was the bright red color strawberry tart, of course layered with multiple strawberry, and a tiny mint leaves for decoration. This is my favorite amigurumi tart~

第二個製作的是鮮紅色的草莓塔, 當然就鋪上數顆草莓, 和小小薄荷葉點綴.這是我最喜歡的毛線塔~


The following two were combination of my own design with the existing pattern in the book, the green tea cream tart and tangy lemon tart.
The green tea cream tart was topped with a big strawberry on vanilla mousse, and mint leaves decoration, on the macha flavor cream.
The tangy lemon tart was topped with two slices of oranges with side of vanilla mousse and mint leaves.

接下來的兩個是結合我個人的創意和書上的圖樣, 創造出來的綠茶奶油塔和酸甜檸檬塔.
綠茶奶油塔擺著一顆大草莓於香草克林姆上, 以薄荷葉裝飾, 鋪在抹茶口味的奶油上.
酸甜檸檬塔呢則擺上兩片柳丁片, 同樣以香草克林姆和薄荷葉裝飾.


During this leisure afternoon, which one do you prefer for your tea time?

在這個悠閒的午後, 你想要享用那一種當下午茶呢?


Pin It Now!

Friday, January 27, 2012

Amigurumi Sackboy 小小大星球鉤織娃娃

Although I'm not a fans of gaming, but the look of this little fellow - Sackboy, is just too cute to be ignored.

雖然我不是一個電玩愛好者, 但是這個小小大星球娃娃的樣子, 真是可愛得沒辦法忽視.

Found this free crochet pattern of the Sackboy shared by Nerdigurumi, can't wait to make it.

網上找到Nerdigurumi分享的免費Sackboy的鉤織圖樣, 迫不及待的動手製作.

Little Big Planet Sackboy - with Pattern

During the process, I found some confusing part on the eyes and also the stitches count, and thank you so much for Nerdigurumi to answer my question which able to help me to complete it.

過程中, 我對於眼睛部位還有針數計算有點混淆, 但是多謝Nerdigurumi的回覆才讓我能夠成功完成.

For me, the hardest part was to sew on the zipper part, I've tried few times and finally had to accept the best out of the worst.

對我來說, 最難的就是縫上拉鍊的樣子, 嘗試了幾次, 最後只好接受最差中的最好作為結果了.

What do you think of my Sackboy?

你們覺得我的Sackboy如何呢?


Pin It Now!

Tuesday, January 10, 2012

Amigurumi Bunny Latte 拿鐵小兔鉤織娃娃

終於, 我創始了我的第一隻鉤織娃娃圖樣, 拿鐵小兔 好開心, 好滿足~
以我的能力, 這已經是很大的進步了!

Finally, I've created my first ever amigurumi pattern, the Bunny Latte, I felt so happy and satisfy~
With my ability, this is consider a big improvement for me!

原本我的構思, 是想做一隻咖啡綿羊, 可是完成頭部和身體後, 覺得它更適合成為兔寶寶, 況且我也沒有鉤織過兔子, 就來一次嘗試吧.

My original idea was to make a coffee color sheep, but after I finish the head and body, I found it more suitable to be a little bunny, and since I've never made a bunny before, so decided to give it a try.

我以往的鉤織娃娃幾乎都是手腳瘦瘦的, 這一次的拿鐵小兔我就想要和愛睡綿羊寶寶類似的胖胖的手腳, 當然這個小兔的腳就比較長, 但是要有大腳板 (其實我還覺得我的這個腳板不夠大, 或許下次再改良).

Almost all my previous amigurumi having slim arms and legs, so for this Bunny Latte, I wanna something more plumpy, similar to the one in Sleepy Baby Sheep, of course this bunny's legs going to be longer, but with big feet (I think mine is still not big enough, maybe will make another better version next time).

一般的兔耳朵都是耳背一色, 耳洞就另一個淡色, 但是在我亂嘗試, 加上比較簡單的做法, 我覺得我這個段色耳朵還蠻特色的, 哈~

Normally, the bunny ears will have one color as the back, while another lighter color as the ear hole, but after I simply try, and also easier method, I think my block-color ear looks quite unique, haha~

我很高興我在網上買到了這個娃娃鼻子(還沒在店內看到過), 配上去比起縫上去好看多了.

I'm glad that I've bought the safety nose online (haven't seen any in store), it looks much better than sew-on.

當全部部位組合起來後, 我愛死了這隻拿鐵小兔了!
為甚麼叫拿鐵? 簡單嘛, 就因為它的咖啡和奶色毛線啊, 不就是拿鐵的原色嗎~

After assembly everything, I just love this Bunny Latte so much!
Why it is called Latte? Simple, just because of the coffee and cream color yarns, isn't that the original colors to create Latte~


Pin It Now!